

As I mentioned on social media a few weeks ago, José and I, father and son, have joined La Jaquería, a HackSpace in Almería, to:
- Surround ourselves with curious minds, people with a hacker and maker mindset.
- Encourage ourselves to create more things together ☺️.
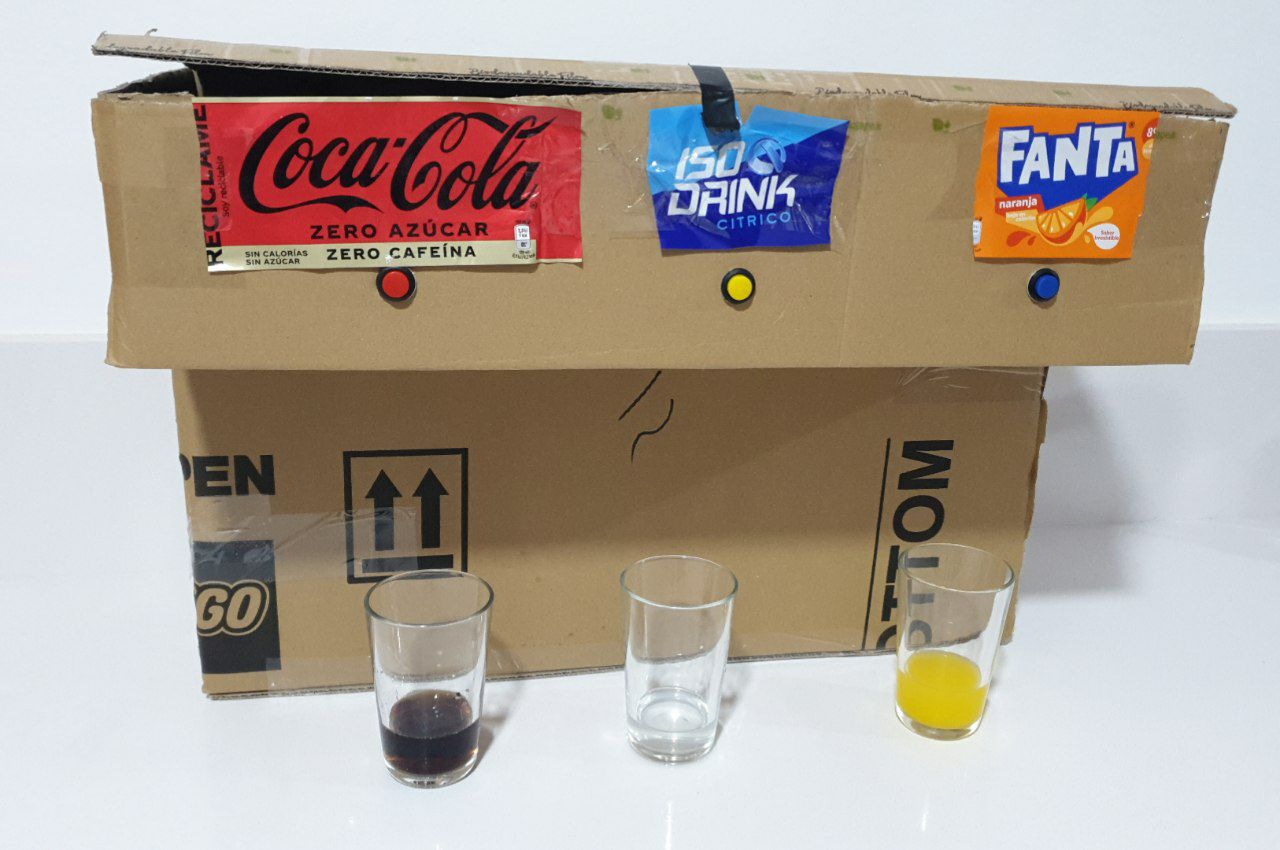
And the first thing we made, which we are going to talk about today, is this soda machine.
Although we are quite strict at home with YouTube usage... we have to thank the "The Q Español" channel for the inspiration for this project, as that’s where José found the video that guided us.
Here is the presentation video we made as a keepsake. And to make it more challenging for José...😂 we did it in English:
As you can probably tell, we didn’t rehearse more than a couple of times 😂. After all the waiting... he was already impatient to try his new machine.
With that said, in this article, we will share: our experience, the materials and tools used, and the steps we followed, for those of you who want to recreate it at home.
You could say that we used project-based learning (PBL) to spend time as a family and create something cool while learning and having fun.
Although initially, the idea was for José to learn basic concepts of electricity and physics, I must admit that I also refreshed and learned things I had forgotten.
What We Learned
Through this project, we covered many concepts about:
⚡ Basic Electricity:
- What electricity is and what it is used for.
- Some ways to generate it.
- Storage and transportation methods.
- Types of electricity: static and dynamic.
- What atoms are, positive charges (protons), and negative charges (electrons).
- Electrical units: volts, amperes, ohms, and watts.
- Differences between battery types: shapes, sizes, rechargeable vs. non-rechargeable.
- What an electrical circuit is.
- What a power source, supply, or battery is.
- Conductive and insulating materials.
- AC vs. DC current.
- The purpose of chargers and transformers.
- How to graphically represent an electrical circuit with basic components.
- How to select the proper voltage and wire gauge for the circuit.
- The difference between connecting batteries in series and parallel.
- How to calculate the battery life of a power source.
⚙️ Basic Physics:
- What a pneumatic pressure extraction system is.
- Basic concepts of how pressure works.
- How an air pump functions.
📦 Other Skills:
- Learning the names of various materials.
- Using different work tools.
- The approximate price of various materials.
- Basic notions of product design.
Before You Start
This tutorial must be carried out under constant adult supervision. It is meant to be educational and fun, but accidents can happen if tools and materials are not used carefully.
Therefore, we assume no responsibility for any accidents, injuries, or damages that may occur during the construction or use of this machine.
Requirements
Let's start by reviewing the knowledge, time, materials, and tools you will need.
Knowledge
Do you need to be handy to follow this tutorial? Or particularly skilled with technology? Our goal is to make it accessible for any family, regardless of prior knowledge or experience.
That’s why we divided it into several sections, explaining each step in detail, including theoretical concepts to help understand how each part functions.
Time
Is a lot of time required? Once you have all the materials, it took us about 6 hours to make our machine, but:
- A lot of time was spent designing the cardboard templates. We are providing you with a template with measurements.
- We wasted time making and remaking some electrical connections. By following this tutorial’s step-by-step process, you won’t have the same issue.
We estimate that it should take about 3 to 4 hours.
Materials
Regarding materials, the ones we recommend here don’t match exactly with the machine we made (as seen in the photos).
Instead, this article suggests the materials we would buy today based on our lessons learned.
The estimated budget for materials is around €35. If you already have some of these, it may cost less.
Here is an image showing the required materials:
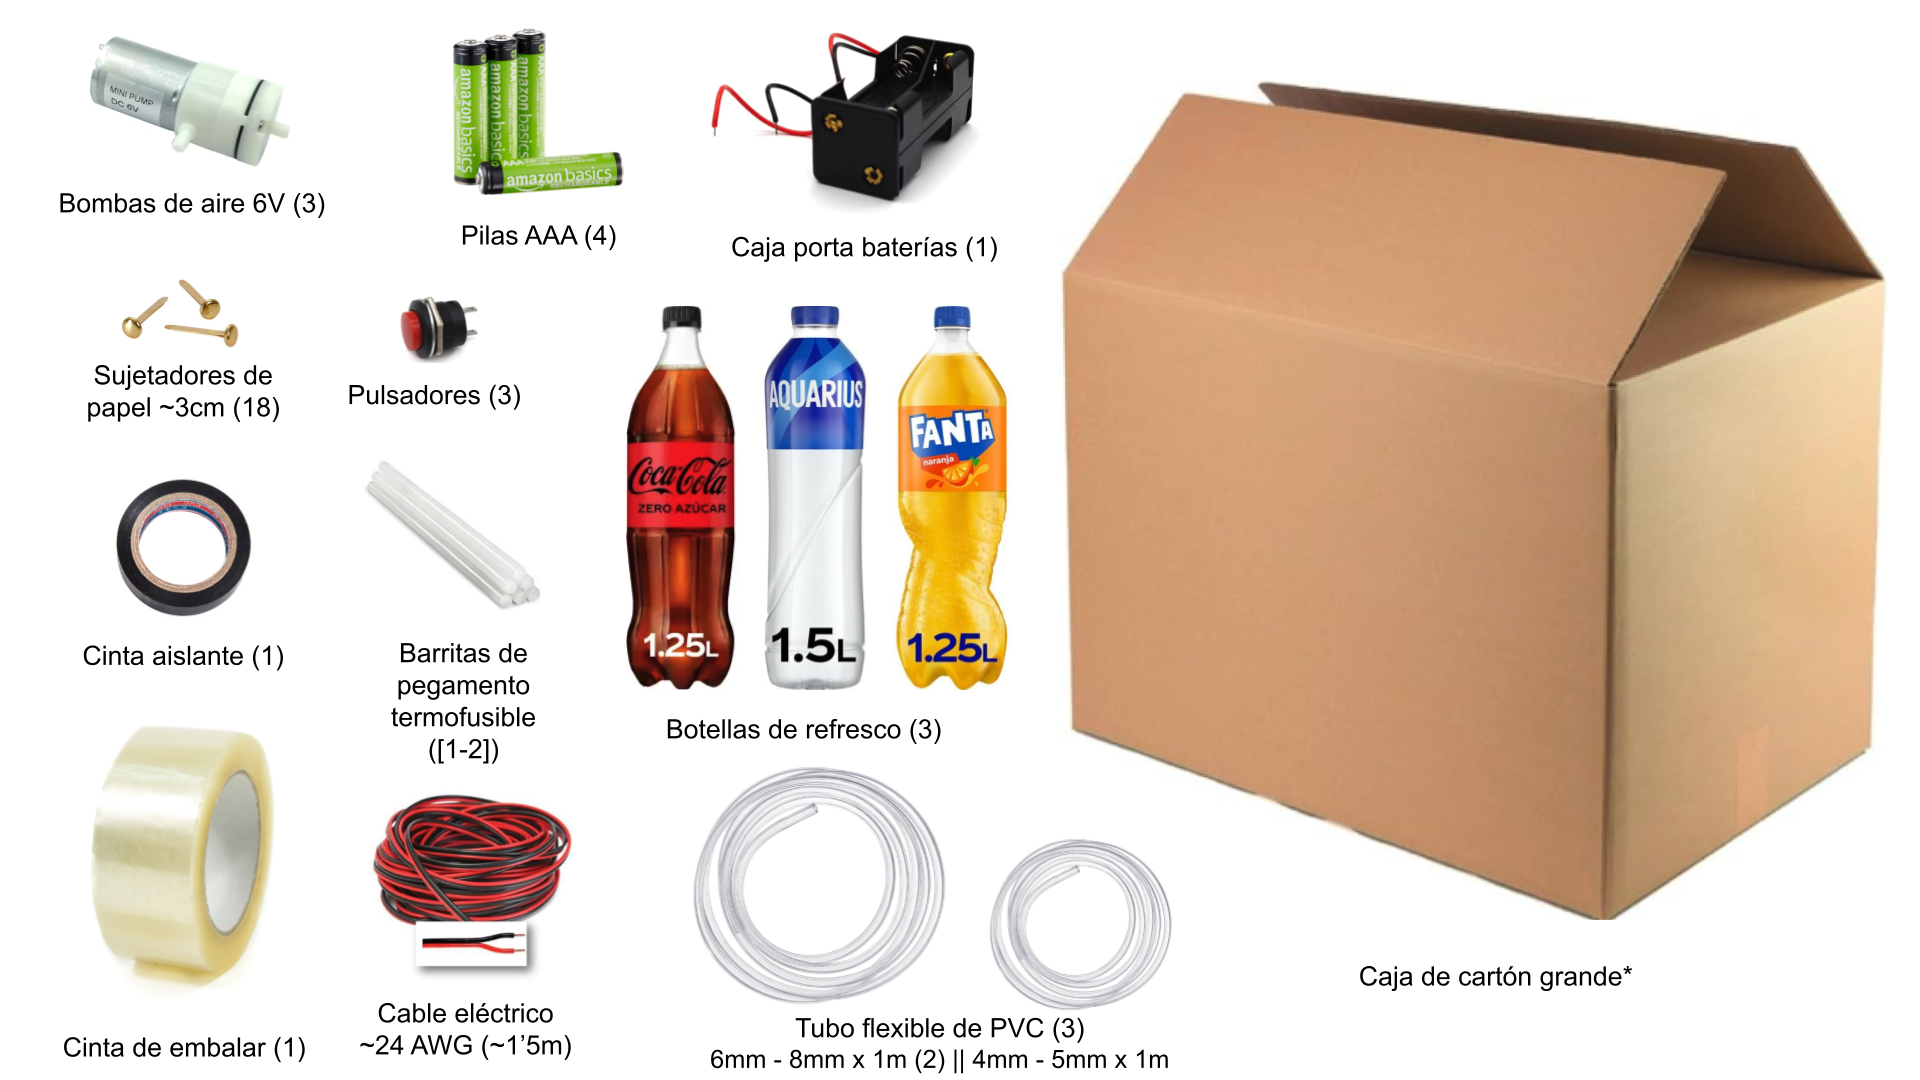
Here is a list of the materials with an approximate price:
- 3 x air pumps (6V): ~12€.
- PVC hoses.
- 1 x inside-outside diameter (4mm-5mm) x 1 meter: 1€.
- 2 x Inner-outer diameter (6mm-8mm) x 1 meter: 2,66€.
- Hot melt glue sticks (2): ~2€.
- 3 x Push buttons: ~3€.
- 4 x AAA batteries: 1,5€ or ~11€ rechargeable.
- 1 x Battery box (AAA): 0,20€.
- 1 x Insulating tape: ~1,5€.
- Paper fasteners (~20): ~2,5€ .
- 1 x Packing tape: ~$3.
- 3 x soft drink bottles (~1.25 liters each): ~$3.
- 1 x roll of electrical cable: ~$1.5 (~1.5 meters >=22/24 AWG).
- 1 cardboard box: free, if you take it from a recycling garbage can.
Tools
- Hot glue gun: ~€13 (example).
- Needle-nose pliers.
- Cutter and/or scissors.
- 1 awl or knife.
Compared to the YouTube video, we replaced the soldering iron and tin with electrical tape, which is easier to handle and less dangerous.
Steps
If you're like us, you like to do things first. That’s why we’ve included the steps to build the machine first, and along the process, we’ve added some references to theory that will help understand how everything works. But if you prefer, you can check them at the end.
1) Structure
You will start by building the cardboard structure, which consists of three pieces.
Approximate time: 1 hour.
Tools:
- Scissors or cutter.
- Ruler (or measuring tape).
- Awl (optional).
- Set square (or something to make right angles).
We used a large hardcover book, specifically "The Very Hungry Caterpillar" 😂.
Materials:
- Cardboard to make three pieces: one of 140cm x 60cm, and two of 46cm x ~36cm.
- Packing tape.
- 3 push buttons.
- ~20 paper fasteners (optional).
MAIN PIECE
Start by taking a piece of cardboard that you can cut into a rectangular shape of 140cm x 60cm. Ideally without folds, but if it has them, draw the template on the cardboard and try to align the folds with those shown in the image:
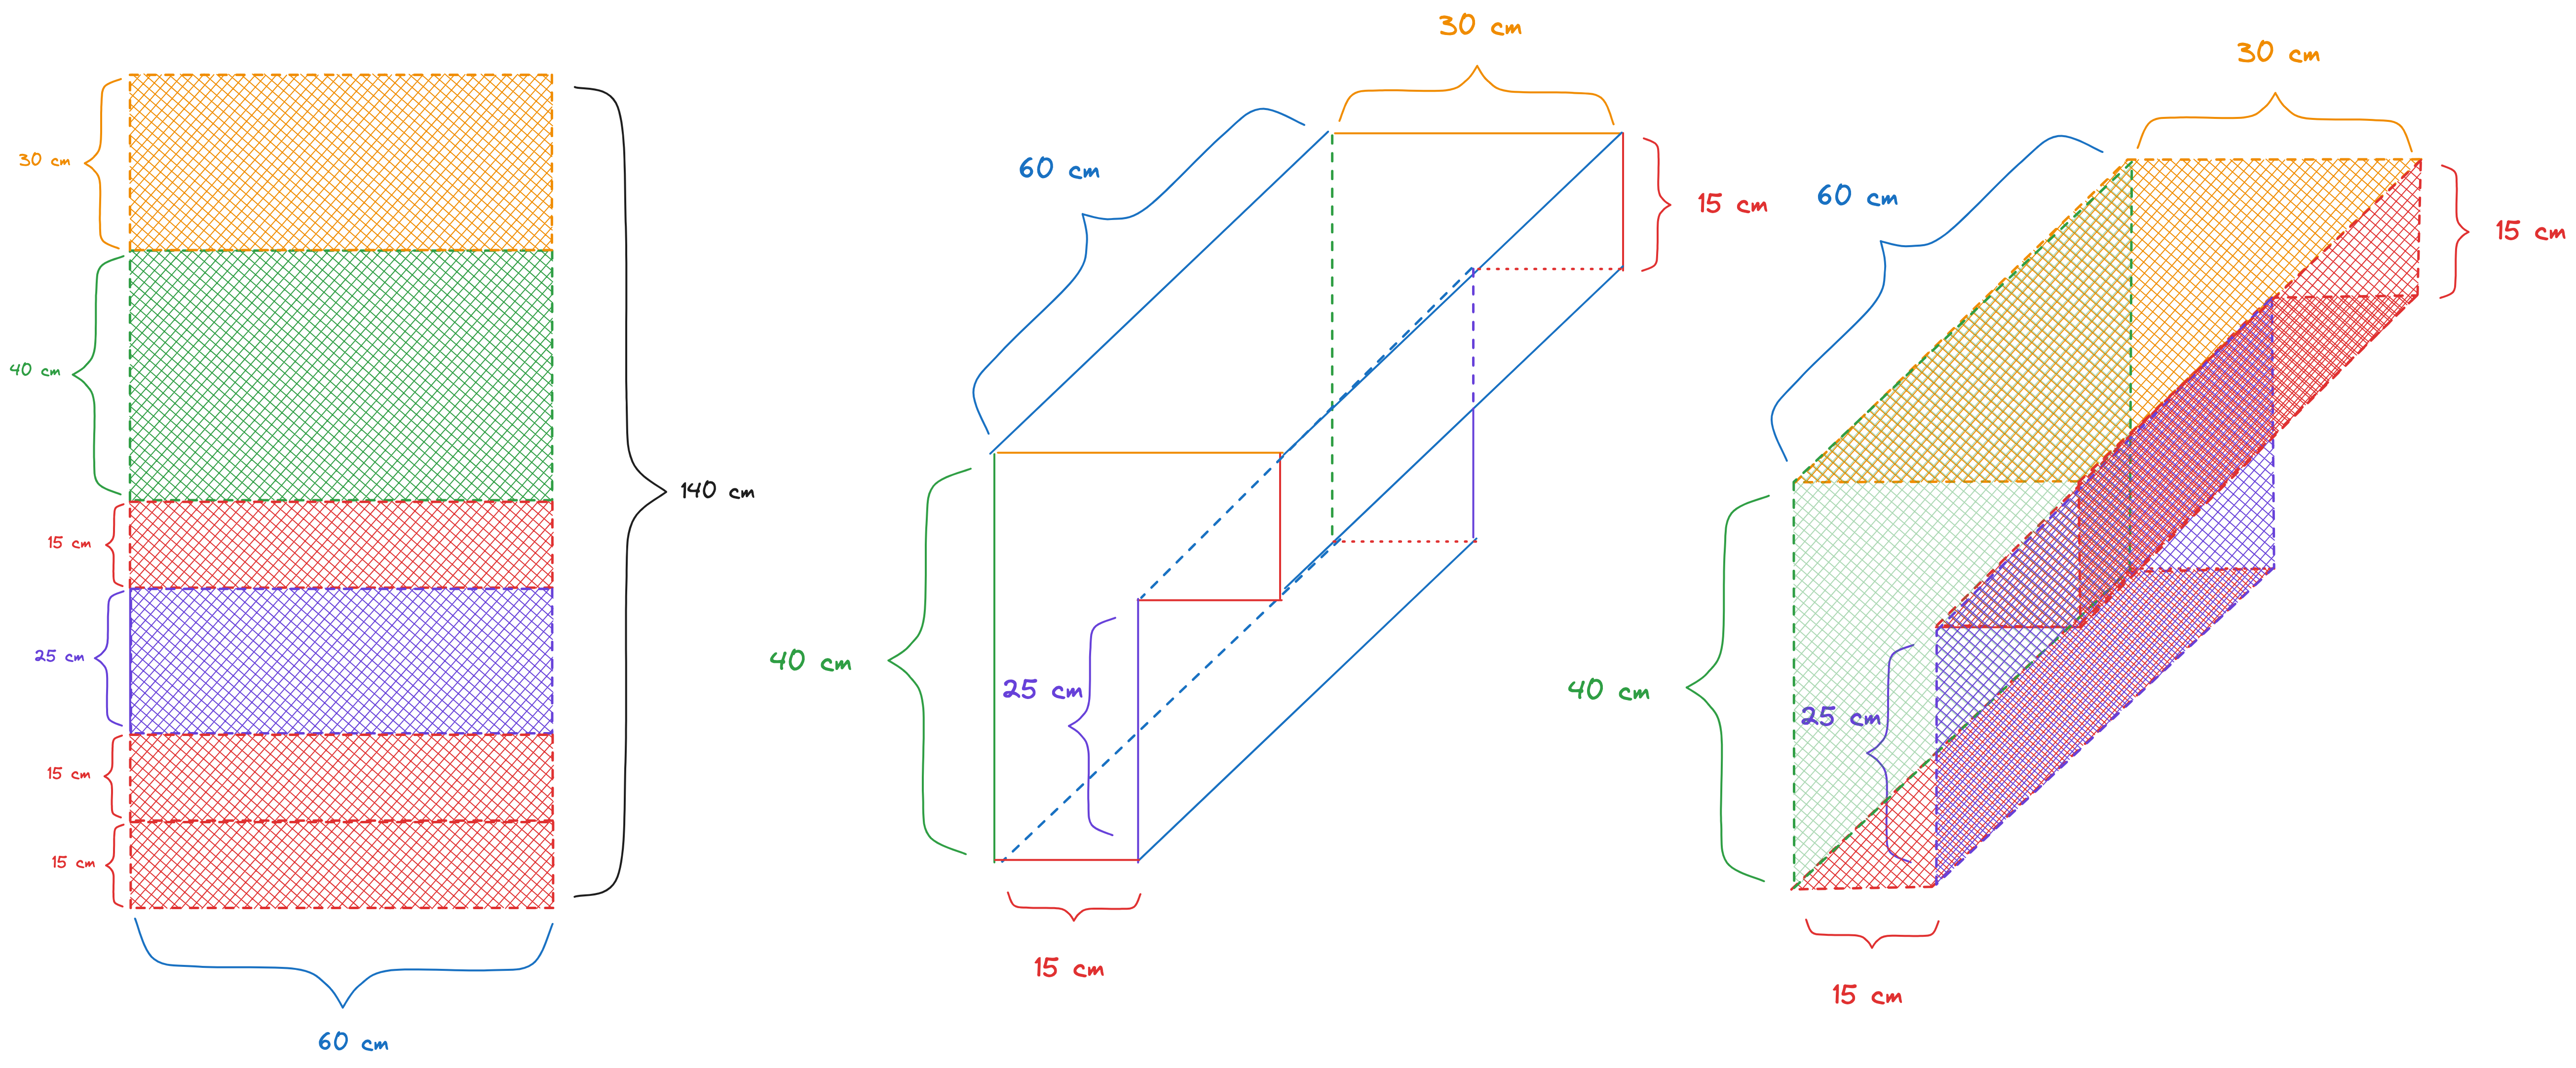
The folds should be at the following distances from the origin: 30cm, 70cm, 85cm, 110cm, and 125cm.
Next, cut the cardboard with scissors or a cutter, and then make the folds. To ensure that the fold is perpendicular to the cardboard's edge, use any sturdy, straight object like a set square, a hardcover book, etc.
After making the folds, do not glue anything yet, as this part will be the lid that must remain open later to insert the drinks.
SIDE PANELS
Next, you will make the two side pieces that will help the structure maintain the desired shape.
Cut two pieces of cardboard with the shape and dimensions shown in the first image:
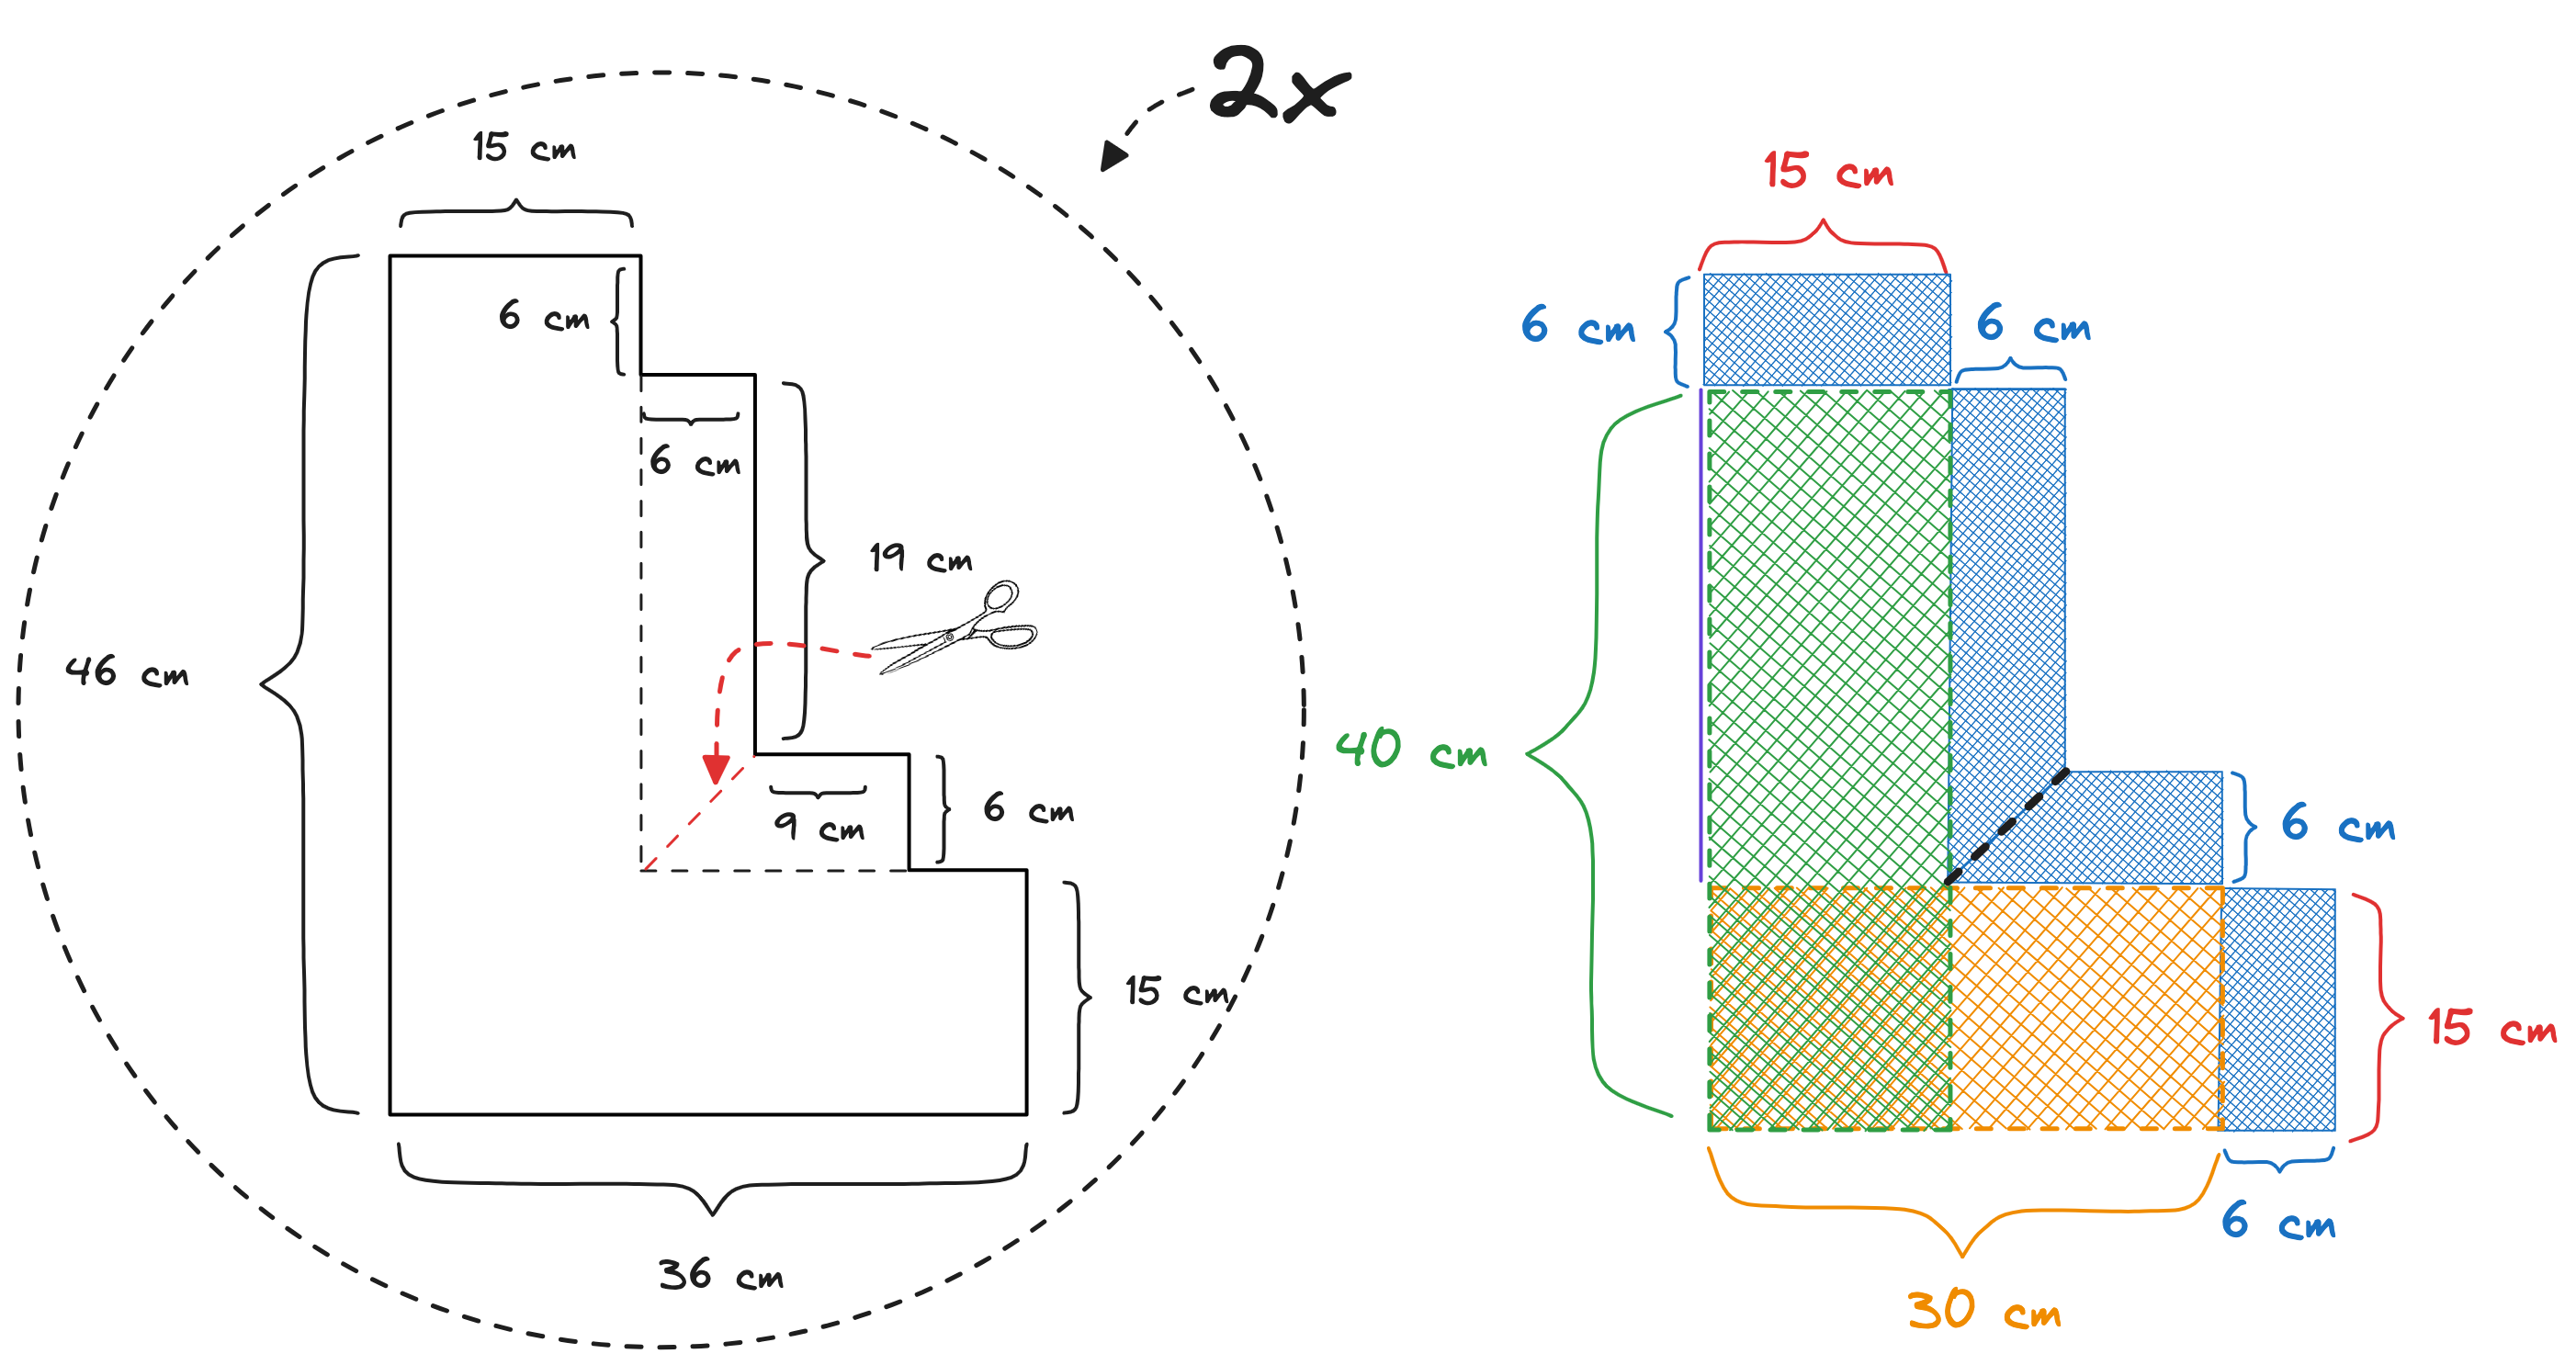
Once done, you need to make a small cut along the red dotted line and then fold the blue tabs (6cm) that will serve as reinforcements. To ensure straight folds, you can use a ruler or book.
Now, join the three pieces, placing the tabs inside the main piece, and secure them with packing tape to hold the shape.
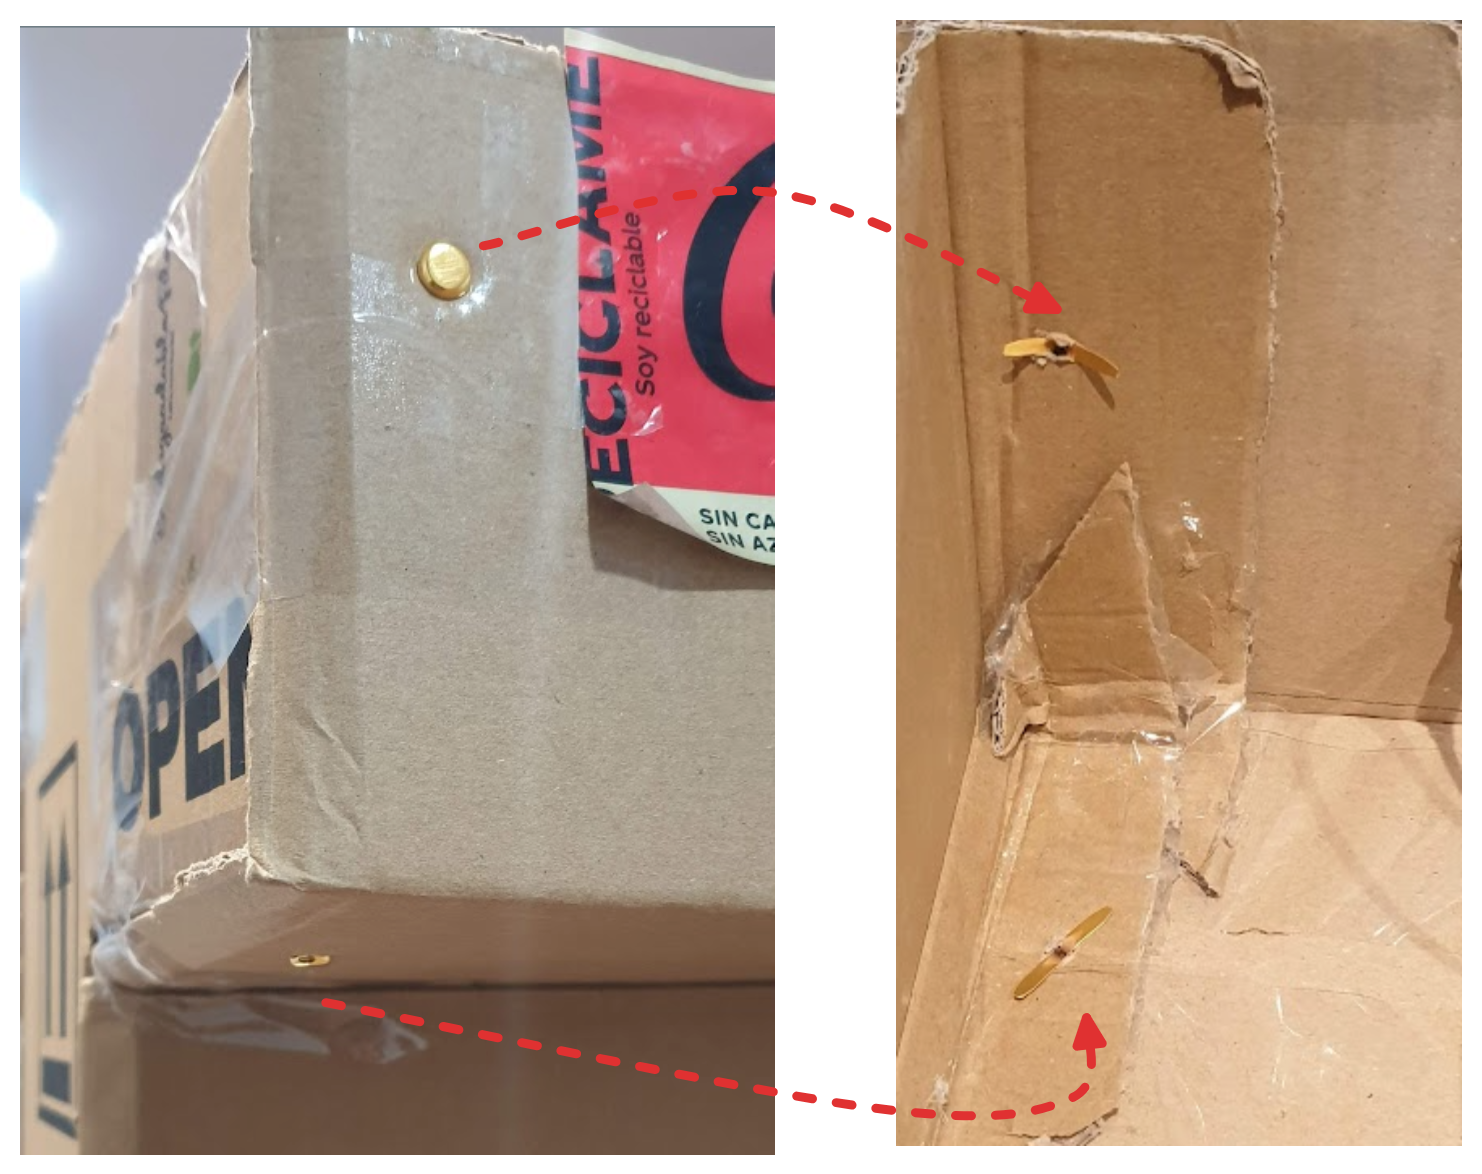
Optionally, if you want, you can reinforce the connection of the three pieces by making small holes and using paper fasteners as shown below:
Note: We added them a few days later 😜.
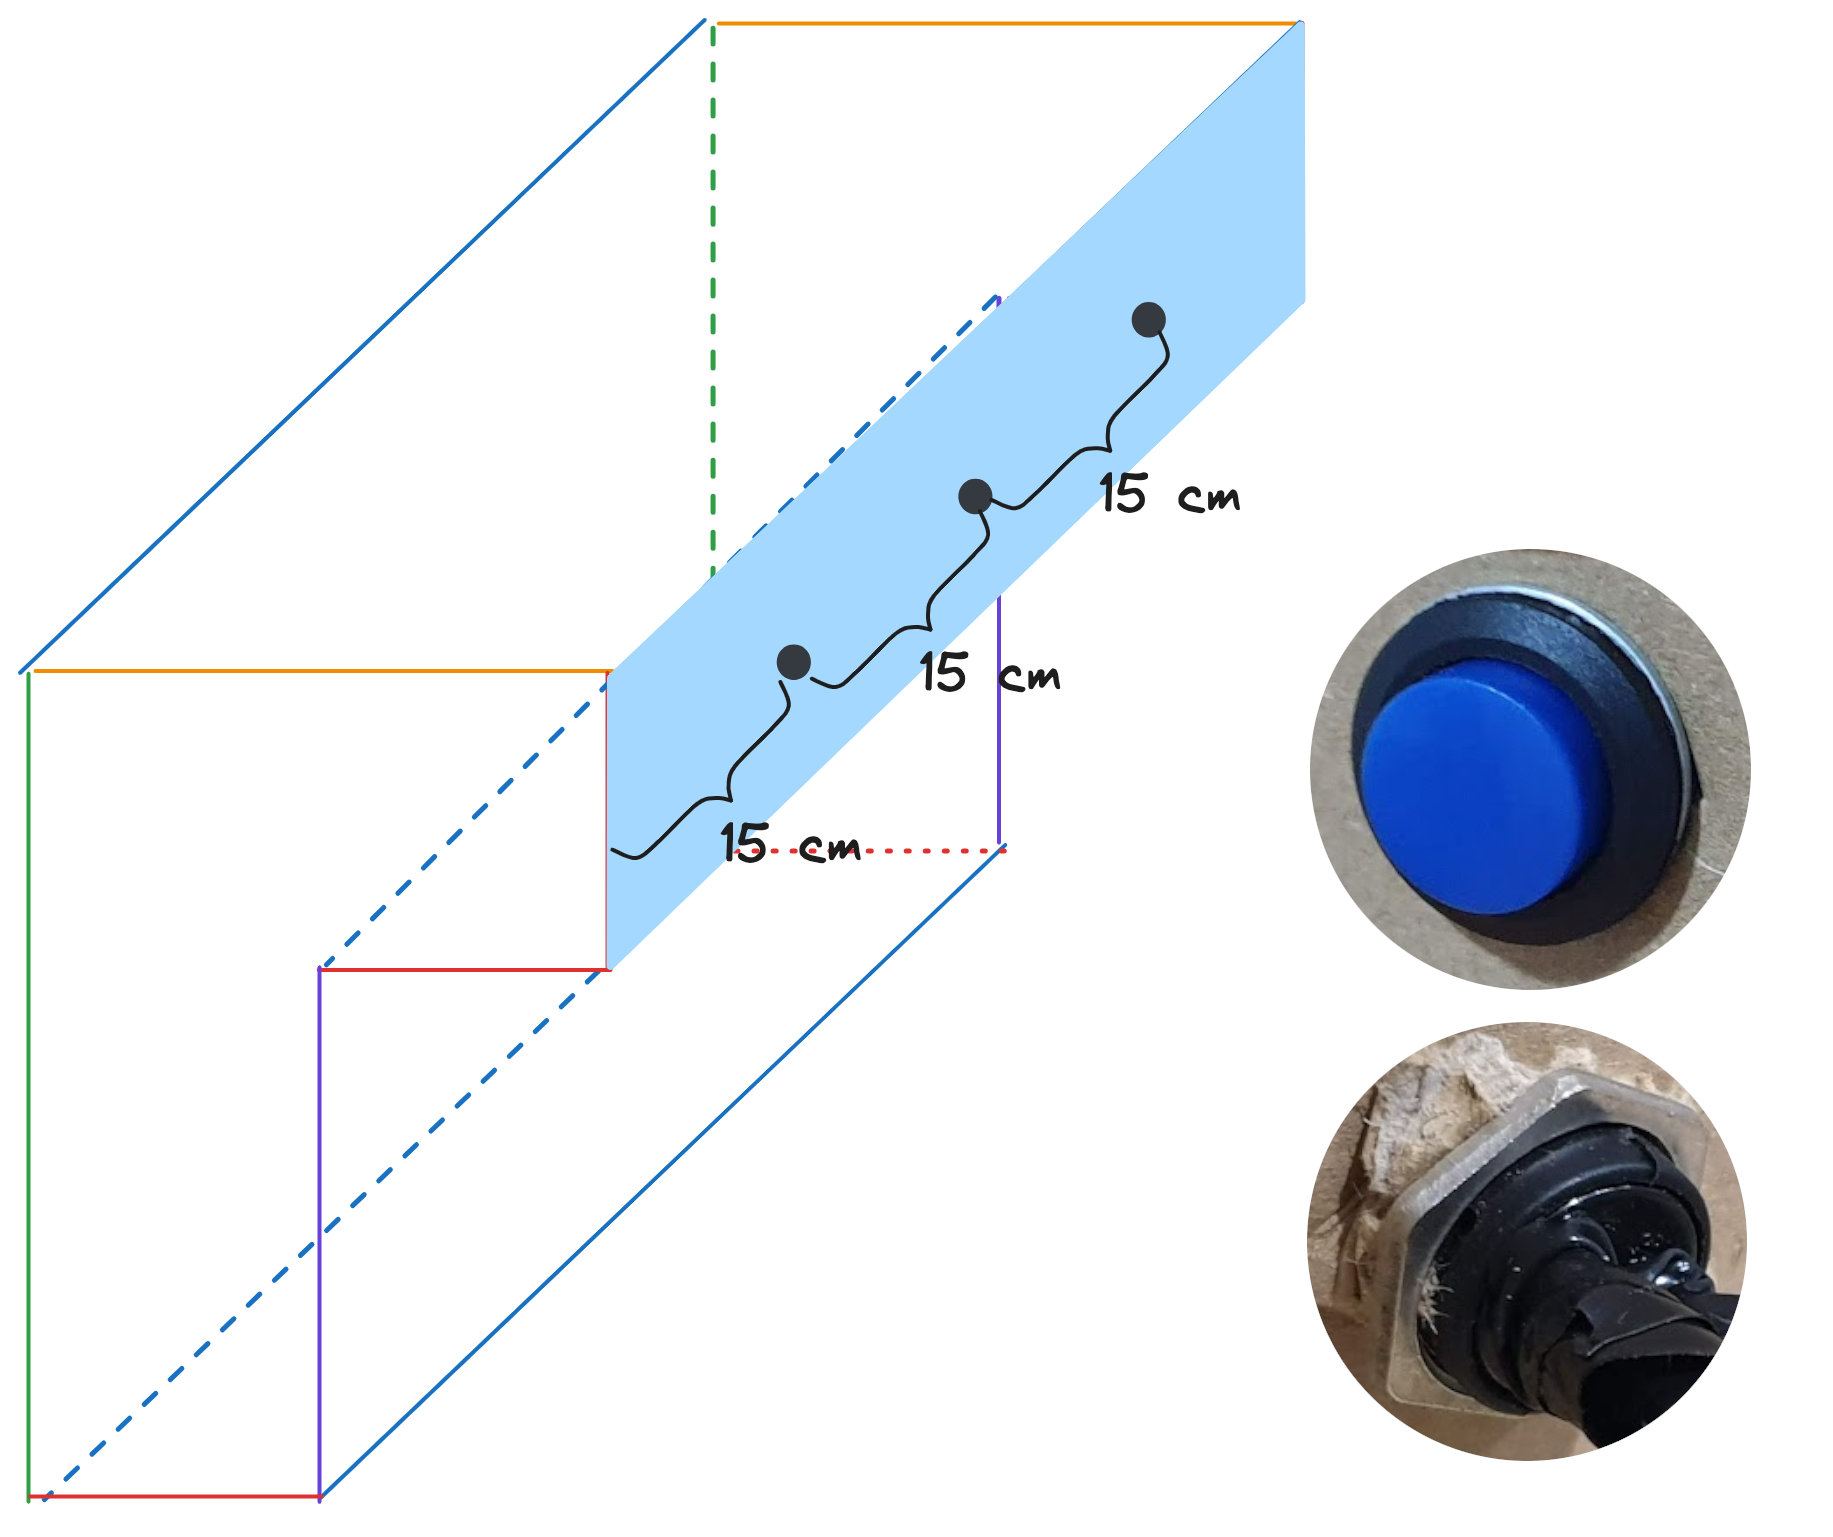
To finish the structure, use the awl (or scissors) to make three small holes where the push buttons will be placed on the front panel.
If you want them to be evenly spaced and centered, they should be 15cm apart from each other and also from the sides.
Next, unscrew and place the three push buttons on the front panel, as shown in the image:
Similarly, on the bottom panel and at the same distance, make three holes where the thick flexible PVC tube will later be placed. But before doing so, I recommend covering that cardboard with packing tape to prevent it from getting wet when inserting and removing the PVC tubes.
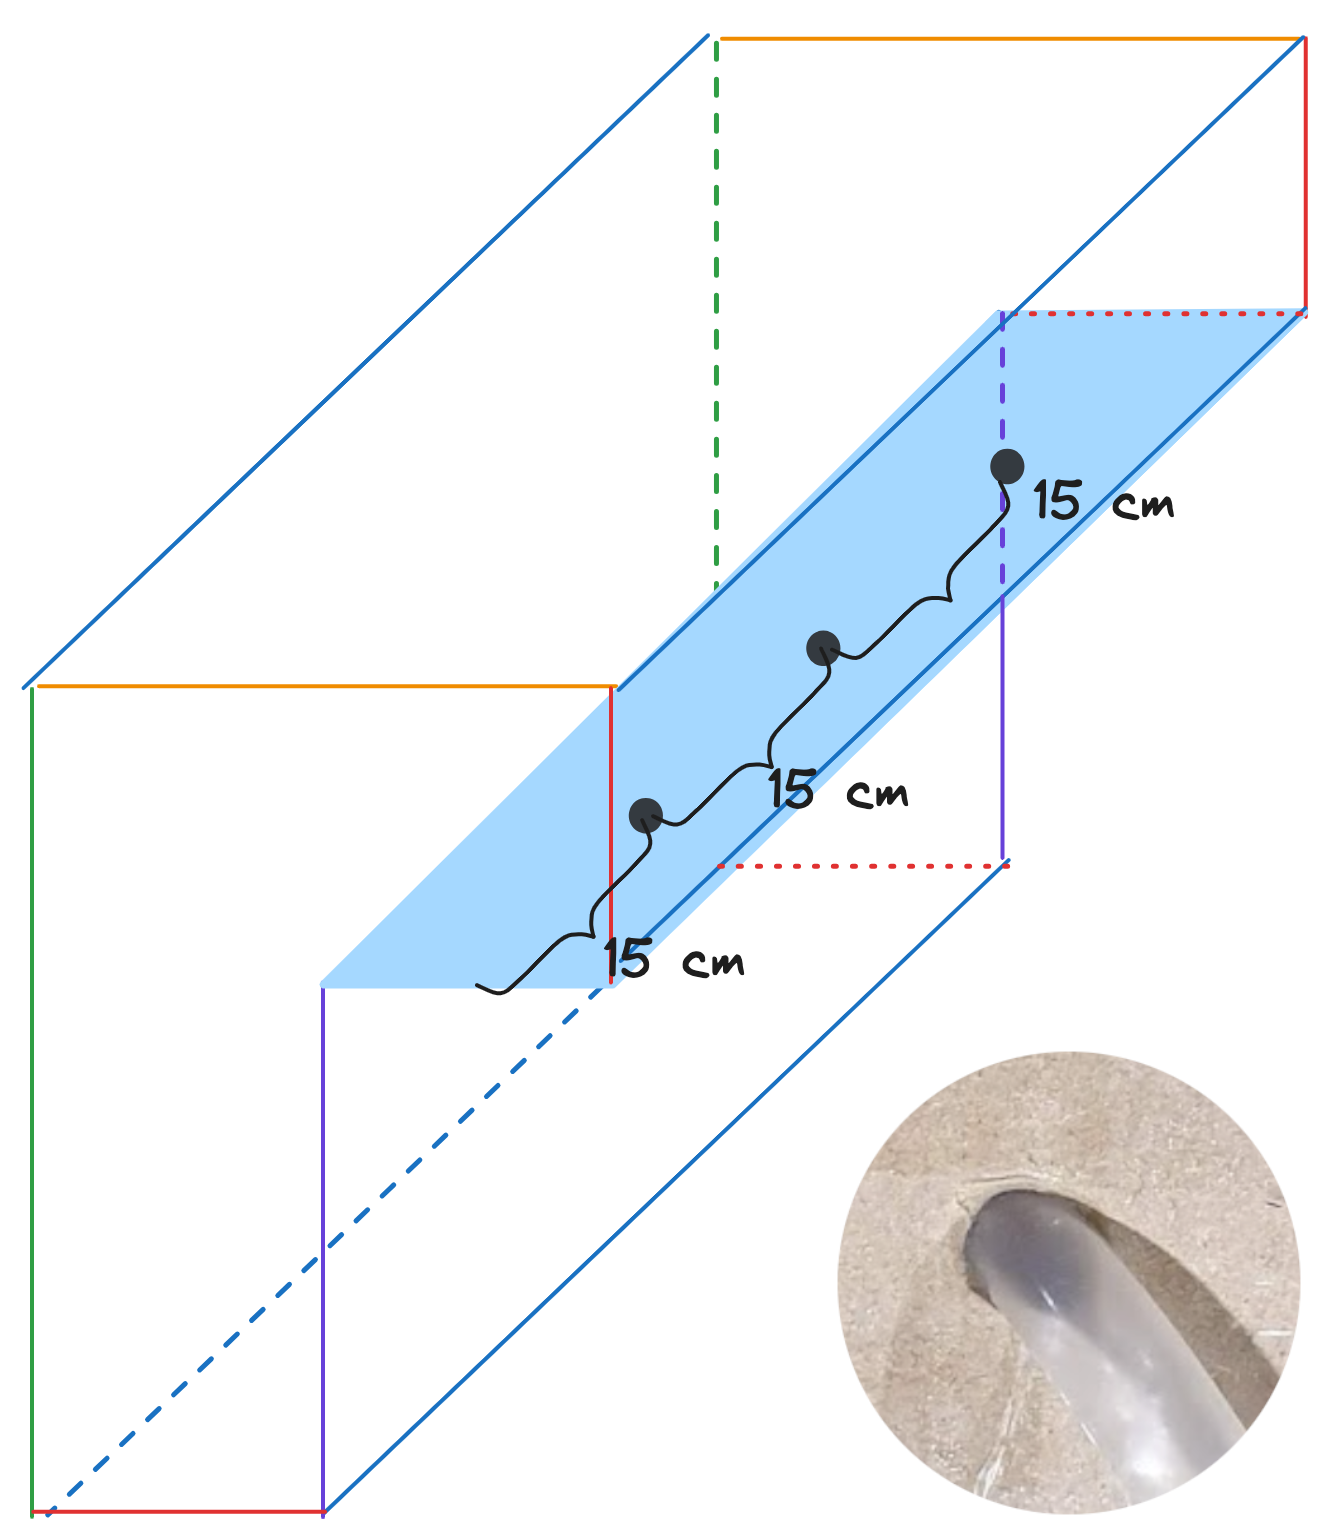
Use scissors or something similar to enlarge the hole gradually, and keep checking with the PVC tube itself that the size is as tight as possible. You don’t want the tube to move too much when dispensing the soda.
Congratulations, with this, you have finished making the structure!
If you look closely, at the base where the sodas will go, the reinforcements create a small step. If you have extra cardboard, you could cut a piece to place on the base to smooth out that step; otherwise, when placing the bottles, they may be a bit unstable.
2) Circuit
Next, you will assemble the electrical circuit that will activate a different air pump when each button is pressed.
Approximate time: 45 minutes.
Tools:
- Needle-nose pliers or scissors.
Materials:
- Electrical wire roll (~1.5 meters).
- 3 Air pumps.
- 4 AAA batteries.
- 1 Battery holder box.
- Electrical tape roll (not packing tape).
And the three push buttons that are already installed in the structure.
Start by cutting the electrical wire into 9 pieces. The wire does not need to be black and red, but this is a good opportunity to explain that there is a convention where black represents the negative (-) pole and red represents the positive (+) pole in direct current circuits.
📚 If you want to review some concepts such as: electric current, the function of conductive wires, power sources, ... expand this section.
To have everything handy, here is an index with theoretical explanations to understand everything related to the circuit’s operation:
- What is electricity?
- Measurement units: volts, amperes, ohms, and watts
- Differences between battery types
- What is direct and alternating current?
- How to graphically represent an electrical circuit?
- What power source to use?
- What electrical wire gauge to use?
- How to calculate the power source’s lifespan?
- How to determine how much energy a device consumes in an hour?
To avoid excess wire and keep the power source centered, the wire lengths should be approximately:
- 3 x 9cm (🔴 red)
- 2 x 20cm (🔴 red)
- 1 x 10cm (🔴 red)
- 2 x 15cm (⚫️ black)
- 1 x 20cm (⚫️ black)
Now strip about 1cm from each wire end to make the connections.
Since the push buttons are already installed in the structure, you will now work on the box. The first thing you need to do is place some counterweight inside, such as the beverage bottles themselves.
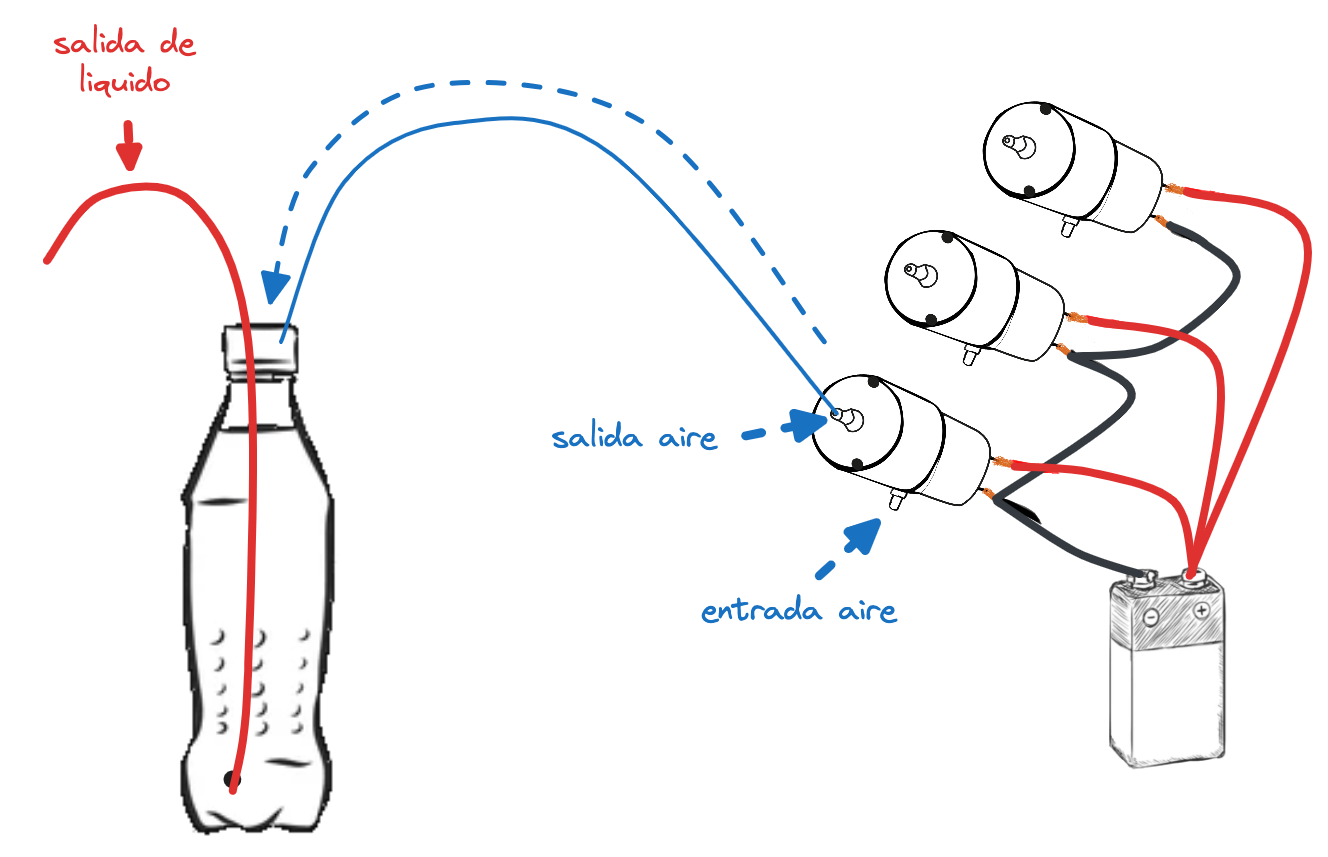
Start by assembling a simple circuit for an easy demonstration.
Make the two connections with the push button (1) and (2), between the button and the motor (3), with the motor (4), and connect wires (5) and (6) to the battery holder box (represented by a battery in the diagram).
Now place the batteries inside the battery holder and press the button. You will see how the motor turns on and blows air:
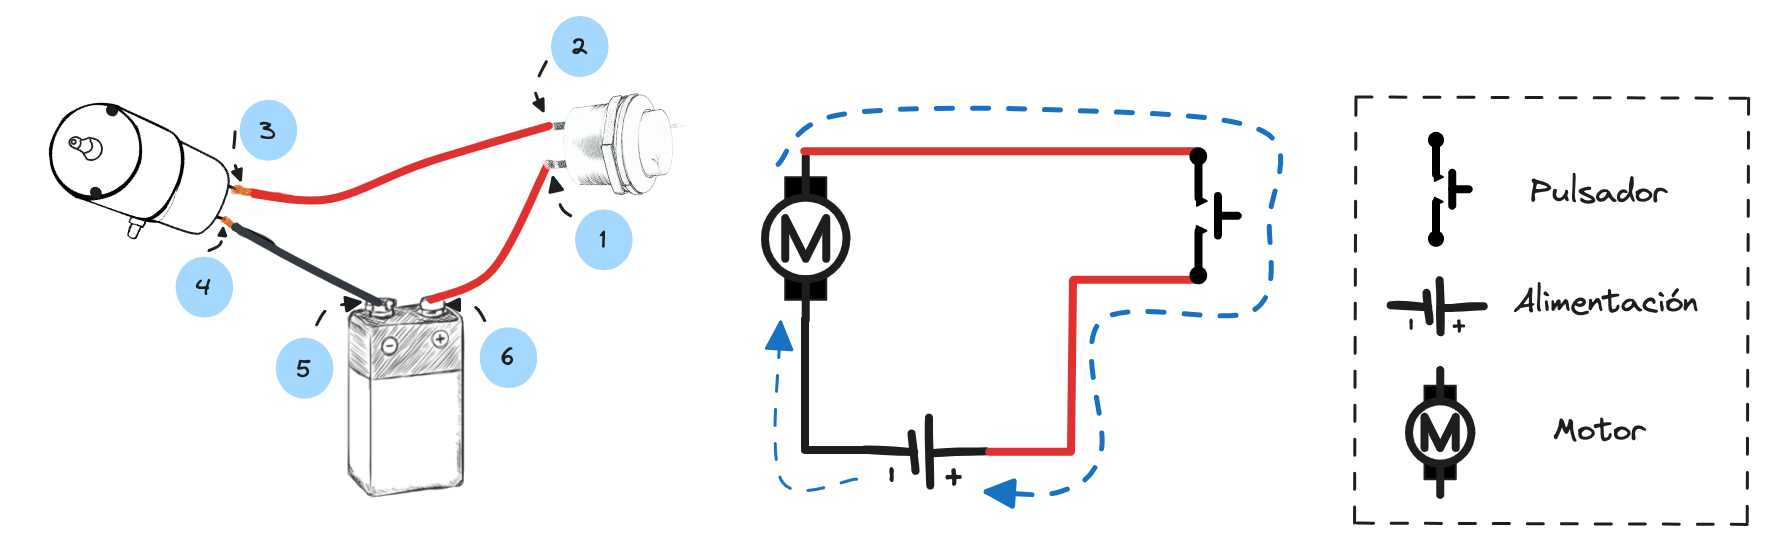
Take this opportunity to review the theory and observe how electric charges move through the conductor when the circuit is closed, how the circuit diagram is drawn, and how components like the button, power source, and motor are represented.
Remember, all of this is explained in the resources we shared in the Theory > Circuit section.
Everything is now ready to complete the circuit assembly.
The following image shows how to do it and where to place each wire:
- 🔴 Red: 9cm (1) (2) (3), 20cm (4) (5), and 10cm (6).
- ⚫️ Black: 15cm (7) (8), and 20cm (9).
The wires connected to the battery in the diagram should be connected to the battery holder.
In our case, we made a mistake and used excessively thick wire (1.5mm thick), along with a 9V battery, which required us to use a connector like the one in the image to easily remove and replace the batteries:
Finally, we recommend applying electrical tape to any weak connections.
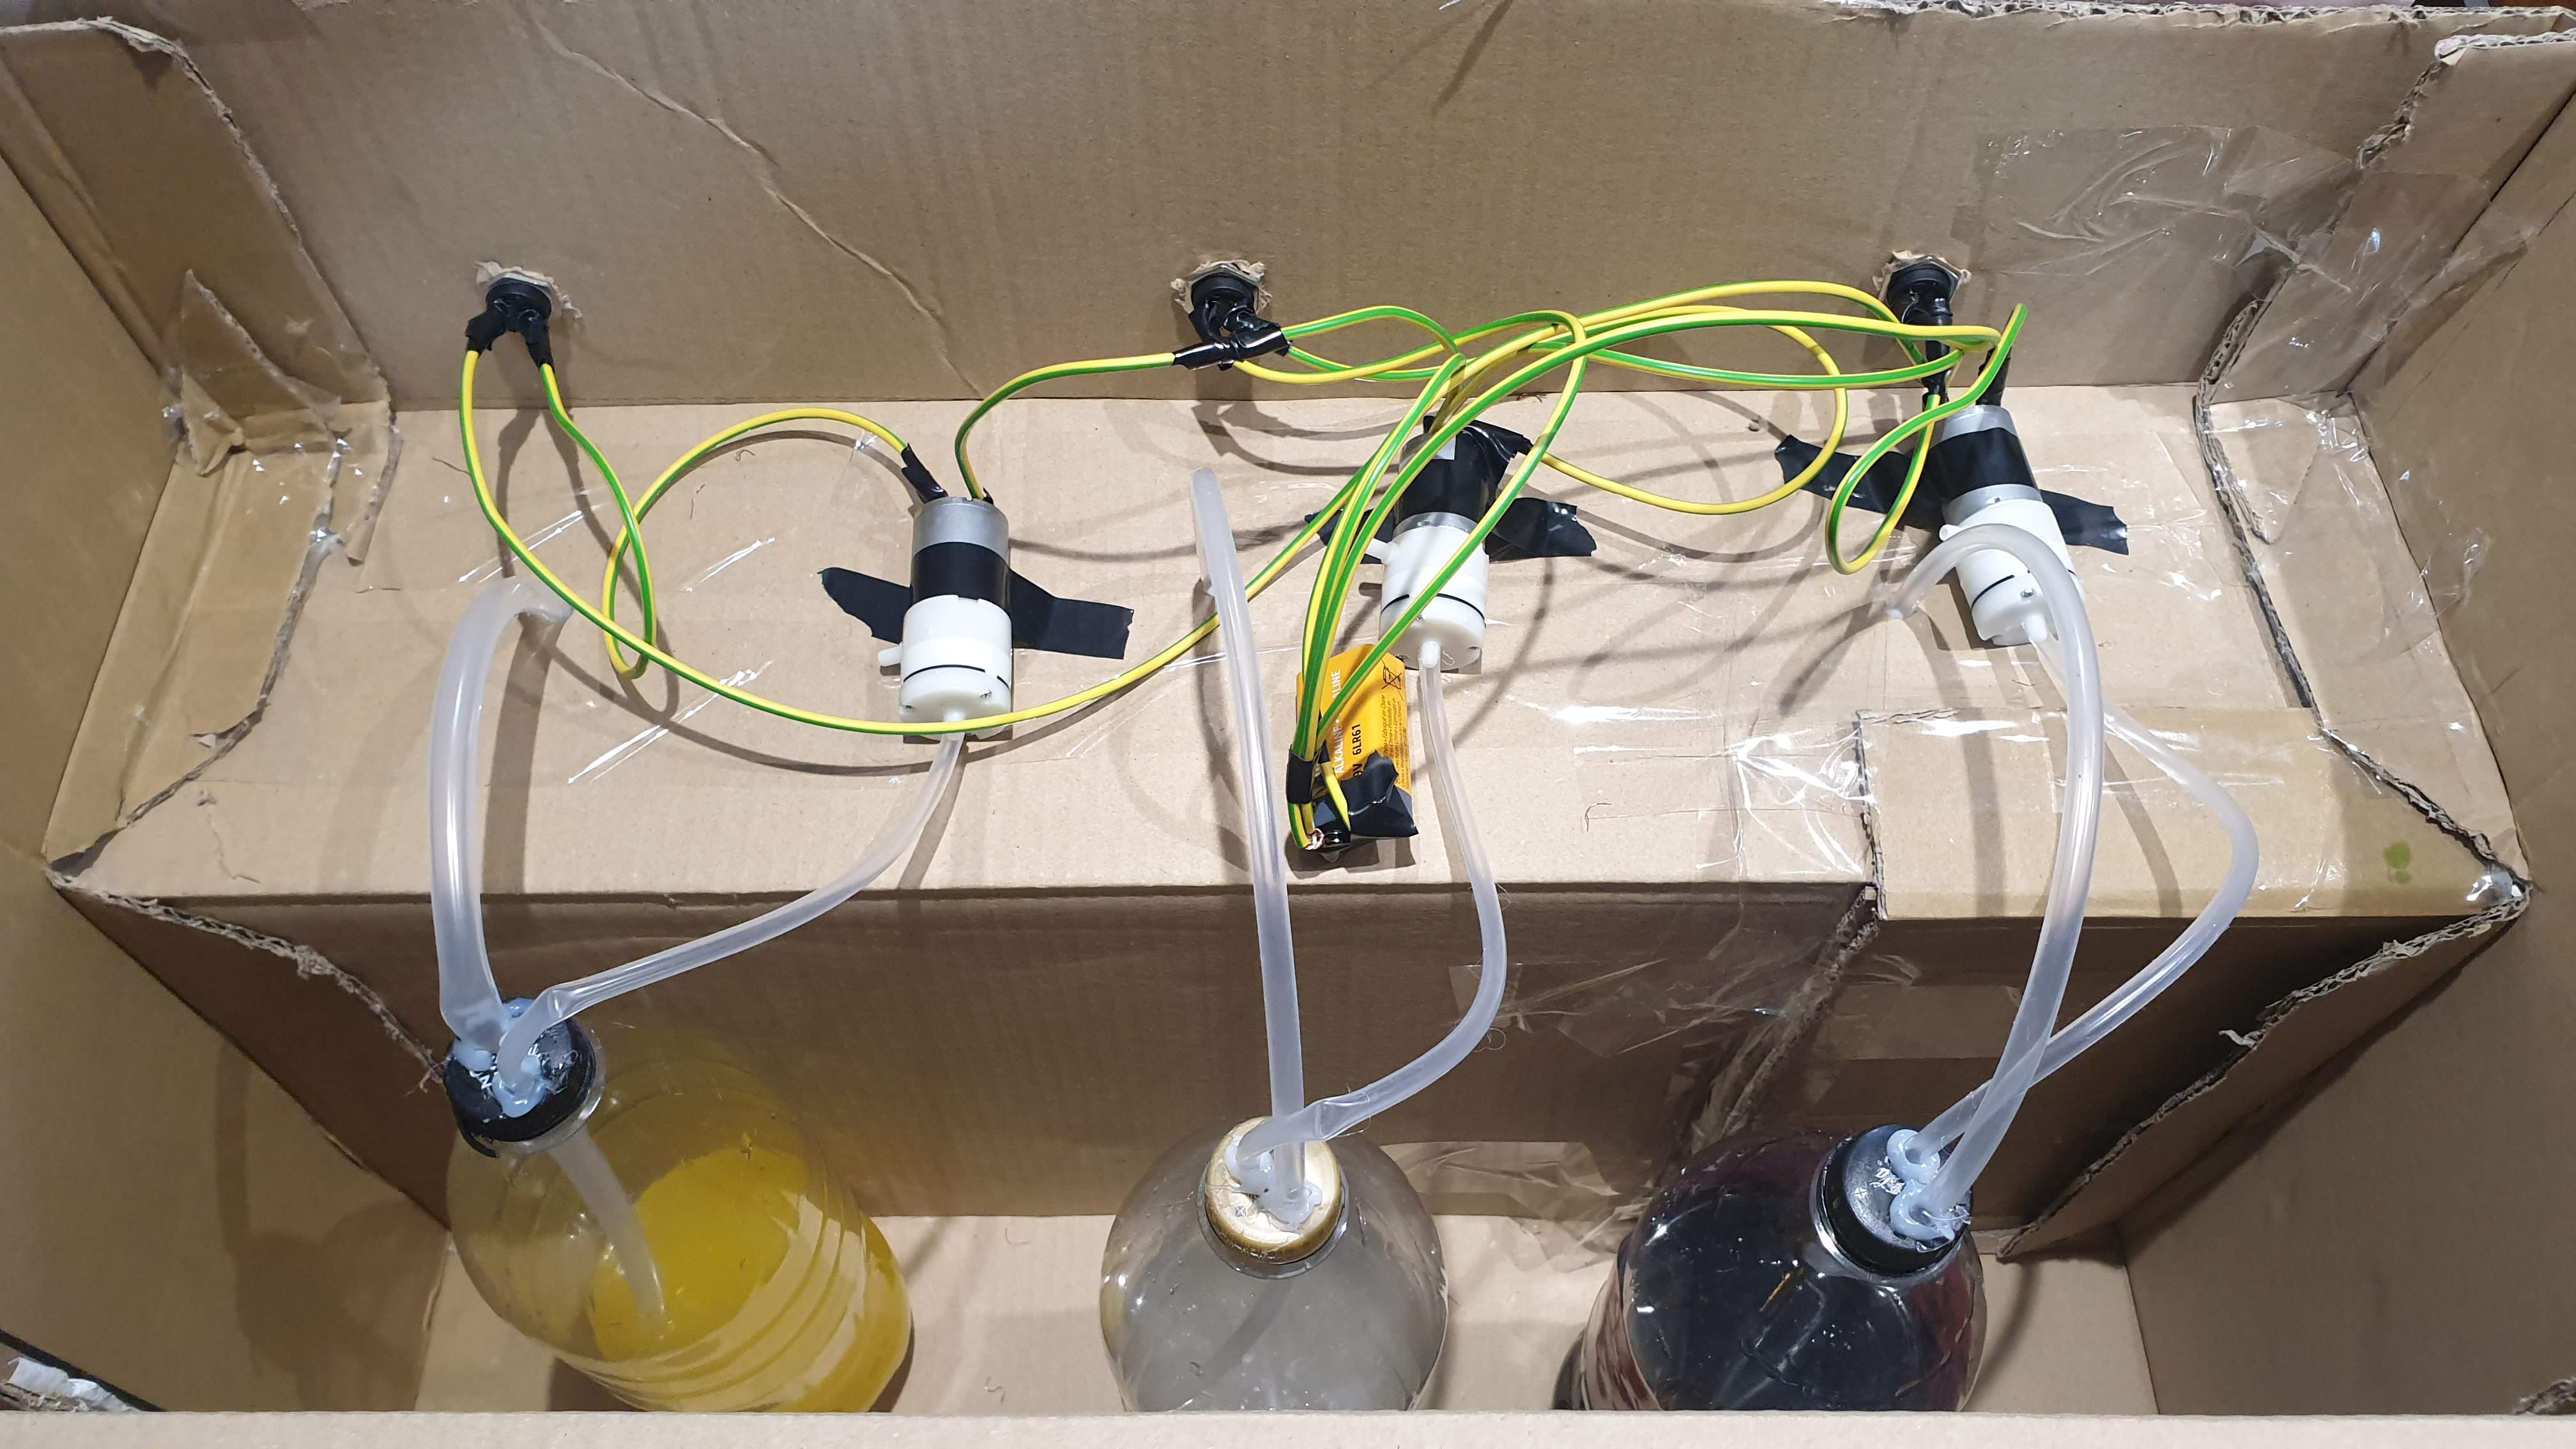
As you can see in the images above and below, we applied it to all the terminals of the push buttons and air pumps, as well as the connections with the battery connector:
The red plastic seen at the junction of the electrical wire with the battery connector was a later "improvement," where we soldered with tin and then applied heat shrink tubing for protection.
Although both electrical tape and heat shrink tubing are used to insulate and protect electrical connections, there are subtle differences:
- Heat shrink tubing better resists moisture and temperature and does not peel off over time.
- Electrical tape is easier and quicker to apply and can be removed later.
3) Dispensers
You're almost there! Only the beverage dispensers are left! 🥳.
Approximate time: 20 minutes.
Materials:
- 3 Flexible PVC tubes.
- 3 Beverage/soda bottles.
- 1 Hot glue stick.
Tools:
- Scissors or cutter.
- Awl or knife.
- Needle-nose pliers (or something to widen the hole).
- Hot glue gun.
Start by cutting the two large PVC tubes (6mm-8mm) in half so you have four parts of approximately 50cm each. These will be the tubes through which the beverage will flow.
Next, cut the small tube (4mm-5mm) into three 25cm pieces, which will be used to introduce air into the bottle.
Then, without removing the bottles from their place, unscrew the caps. Each cap will need two holes: one for the large tube and one for the small tube.
Our advice is to start by making a small hole with an awl, knife, small screwdriver, or something similar. Then gradually enlarge each hole until both tubes fit, ensuring there isn’t too much looseness.
We first tried using a drill, but it seemed dangerous, so we switched to an awl. Then, we carefully widened the holes using the tip of needle-nose pliers until each tube could fit through.
Finally, insert the tubes and screw the caps back onto the bottles. The thick tubes should reach the bottom of the bottles, while the thin ones should only pass through the caps.
Then, use the hot glue gun to seal the openings, preventing air from escaping through the cap holes, like this:
4) Assembly
Everything is ready for the final connections.
Approximate time: 5 minutes.
Materials:
- Electrical tape.
Tools:
- Your hands 😜.
Now, simply connect the thin PVC tubes to the air pump outlets as shown below:
Be careful! If you connect the tube to the air inlet instead of the outlet, soda could enter the air pump. We say this from experience 😜, so make sure it’s the outlet. The easiest way to check is to turn on the circuit by pressing the button—you'll feel where the air is coming out.
Finally, place the end of the thicker PVC tube into the hole in the cardboard box.
As you can see in the following photo, we decided to secure the motors to the cardboard box with electrical tape to prevent them from moving due to vibration, resulting in this setup:
Congratulations! You’re now finished! If everything worked correctly, you should be able to place a glass under one of the tubes and dispense your drink just like this:
To avoid annoying drips after releasing the button, it’s best to add a 6mm fluid retention valve. This is especially important when spills might stain the table, like with red grape juice (we also say this from experience xD).
Theory
In this section, you will find all the resources and explanations to understand how the soda machine works.
Circuit
Here is the index for this section again:
- What is electricity?
- Measurement units: volts, amperes, ohms, and watts
- Differences between battery types
- What is direct and alternating current?
- How is an electrical circuit graphically represented?
- What power source should be used?
- What thickness of electrical wire should be used?
- How to calculate the lifespan of the power source?
- How to determine how much energy a device consumes in an hour?
WHAT IS ELECTRICITY?
This 13-minute video from "Smile and Learn" explains what electricity is, its uses, ways to generate it, how it is stored and transported, types of electricity (static and dynamic), what atoms are, positive charges (protons) and negative charges (electrons), etc.
MEASUREMENT UNITS: VOLTS, AMPERES, OHMS, AND WATTS
Next, we will describe some important electrical units:
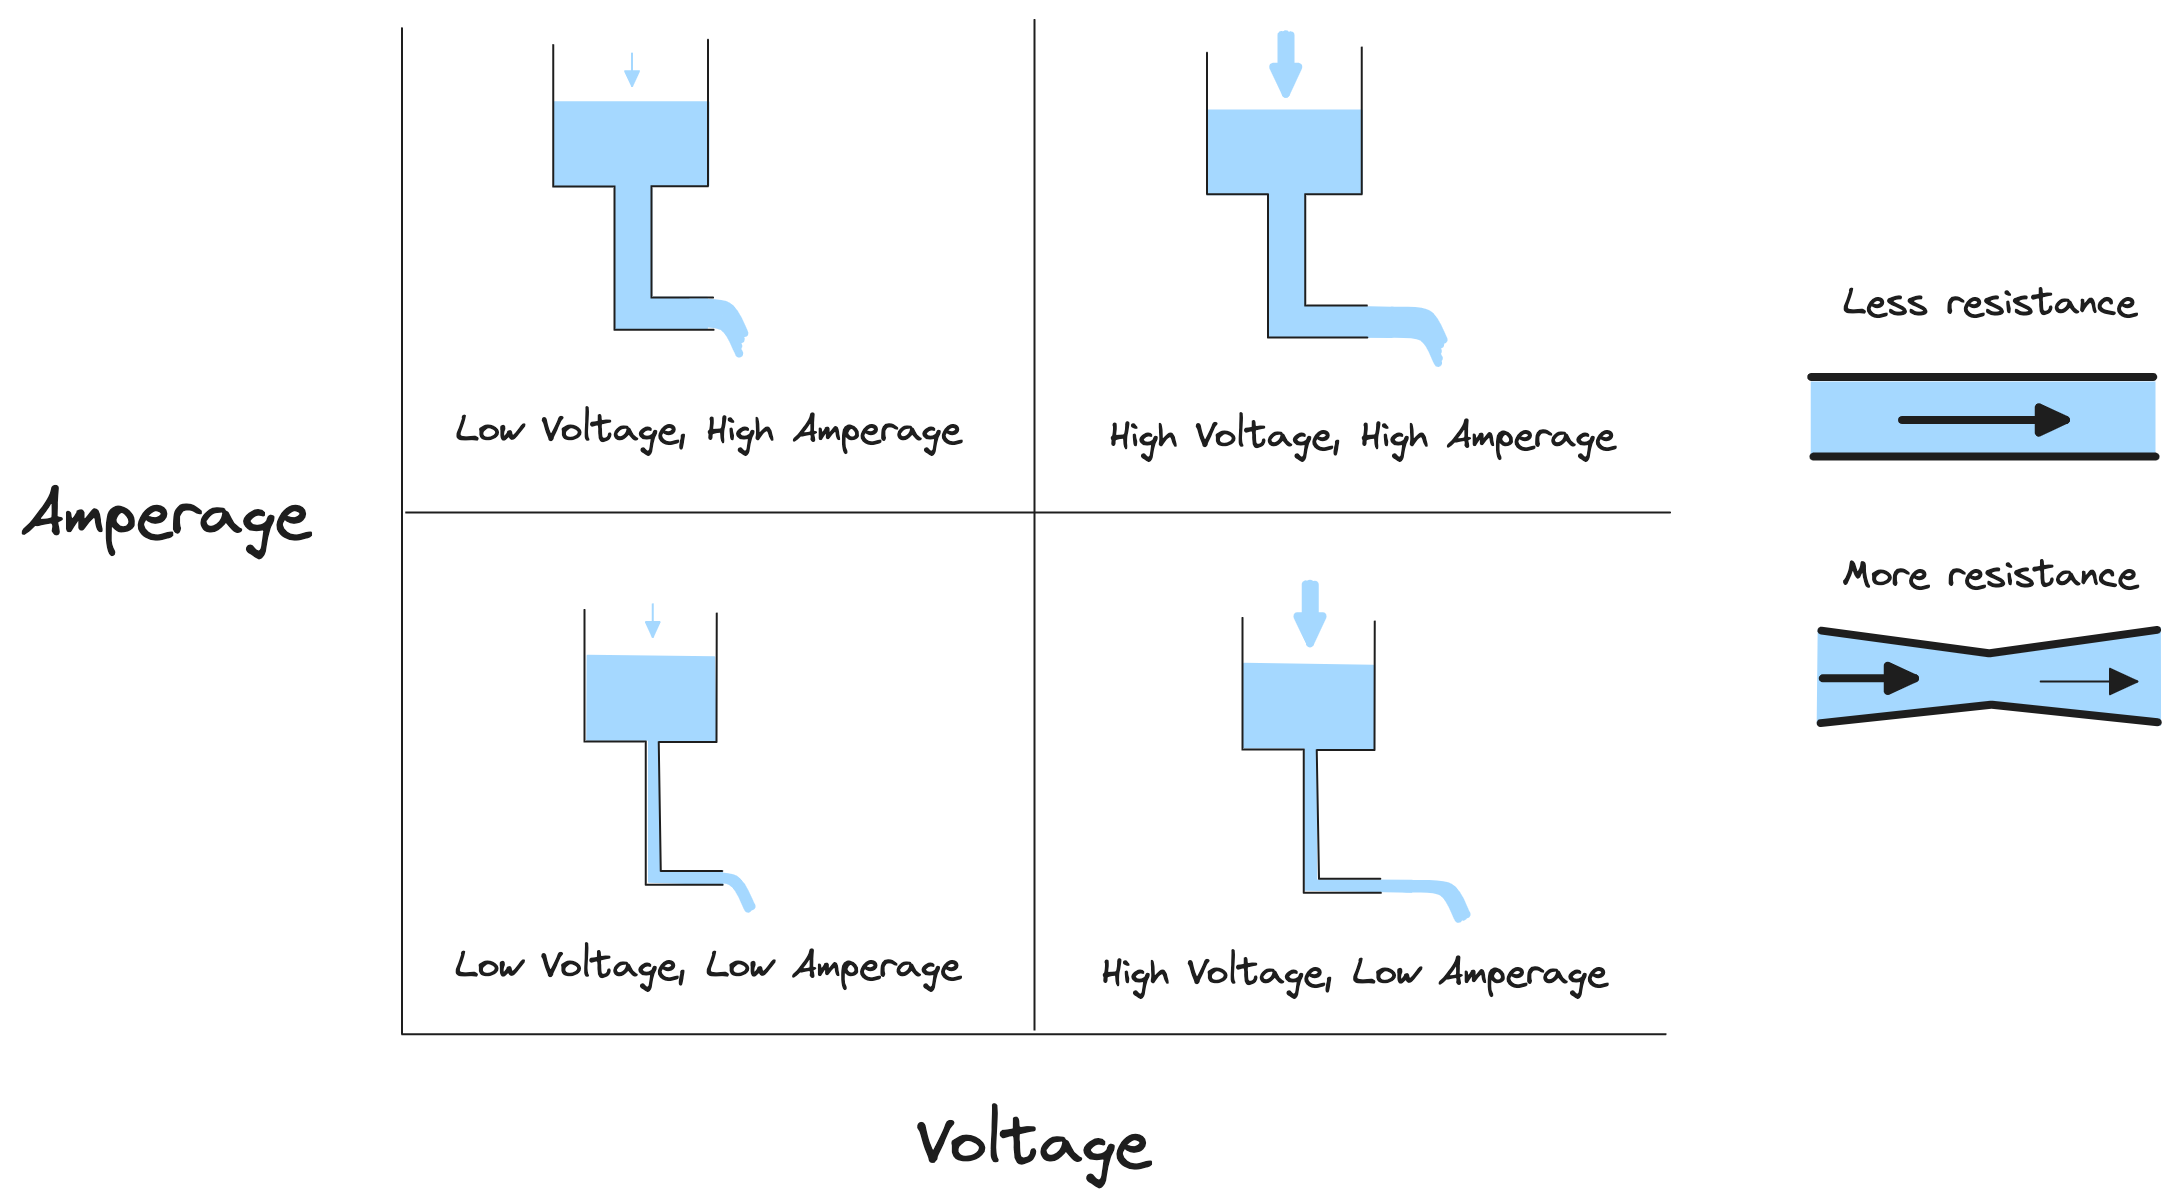
- 🔌 VOLTS (V) - Volts can be understood as the water pressure in a hose. If the pressure is high, the water comes out with more force. In electricity, volts represent the force pushing current through wires. A small battery has 1.5 volts (like a soft stream), while an outlet in Spain has 220 volts (like a strong jet).
- 💧 AMPERES (A) - Amperes measure how much water is flowing through the pipe. If the pipe is large and allows a lot of water through, there are many amperes. In electricity, more amperes mean more current flowing through the wire. For high-consumption appliances like an oven, proper wiring is essential to prevent overheating.
- 🚧 OHMS (Ω) - Ohms are like the resistance in a pipe. If the hose is very narrow, water struggles to pass through. In electricity, ohms indicate how difficult it is for current to pass through a material. A copper wire has low resistance (like a wide hose), whereas a poor conductor like plastic has high resistance.
- ⚡ WATTS (W) - Watts are like the strength of the water coming out of a hose. If you have high pressure (volts) and high flow (amperes), the stream will be strong and move more things. In electricity, watts indicate how much energy a device uses, such as a light bulb or motor. They are calculated by multiplying volts × amperes.
It’s good to know the following about these units:
- 🚨 If you connect a device designed to operate at a specific voltage to a power supply with a higher voltage, you could burn it out.
- 🔥 If a thin wire has to support a high current (high amperage), it will heat up a lot and may burn out.
- 🪫 When a battery gets depleted, its voltage drops until it can no longer properly power devices. For example, most devices stop working correctly if the battery drops below 1.1V or 1.0V. Some more demanding devices may need at least 1.2V to function correctly. So if a 1.5V battery:
- Has more than 1.3V → It still has charge.
- Is between 1.0V and 1.2V → It is nearly depleted.
- Has less than 1.0V → It is dead.
DIFFERENCES BETWEEN TYPES OF BATTERIES
Alkaline vs. Rechargeable Batteries
Alkaline and rechargeable batteries both provide energy to toys, remotes, and other devices, but they function differently.
When we talk about energy, we refer to the amount of electricity required to operate over a given period. Energy is measured in watt-hours (Wh) and depends on the power of the device (W) and the time it is in use (h). For example, a remote control consumes very little energy since it only uses the battery for a few seconds when you press a button, whereas a battery-operated Scalextric track consumes much more energy because it is used more intensively.
Alkaline batteries are single-use: when they run out, they must be discarded and replaced. On the other hand, rechargeable batteries can be recharged many times with a special charger, reducing the need to buy new ones frequently.
An important difference is the voltage. Alkaline batteries usually have 1.5V, while most rechargeable batteries have 1.2V.
Although this may seem like a small difference, as we mentioned earlier, some devices need higher voltage to function properly, meaning alkaline batteries might last longer in those cases. However, rechargeable batteries can be better for frequently used items since they can be recharged and reused multiple times.
Thus, it’s better to use alkaline batteries in devices that are used infrequently or require more voltage (higher potential difference), whereas rechargeable batteries are ideal for daily-use devices that don’t require high voltages to function well, such as flashlights or remote controls. This way, you save money and help the environment by generating less waste.
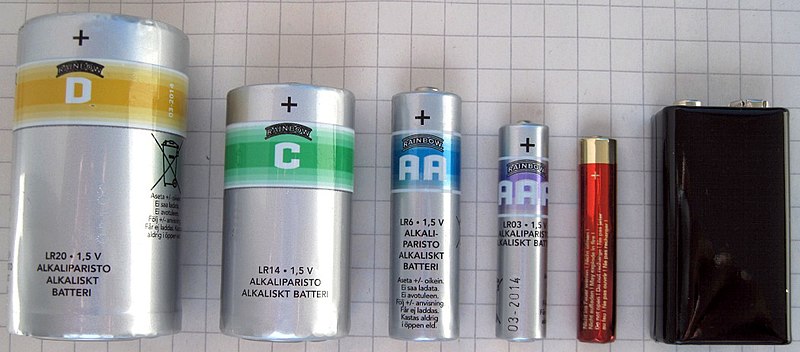
Battery Shapes and Sizes
Batteries come in different shapes and sizes because each is designed for various devices and needs. The difference is not just in shape but also in voltage, capacity, and intended use.
Cylindrical Batteries (e.g., AA, AAA, AAAA, C, and D): These are the most common and have a voltage of 1.5V in alkaline versions and 1.2V in rechargeables. The difference between them lies in capacity, meaning how much energy they can store. For example, a D battery lasts much longer than a AAA because it is larger and has more capacity.
Button Batteries (such as those in watches or hearing aids): These are tiny and have voltages ranging from 1.5V to 3V, depending on the type. They are used in devices that need little energy but for extended periods, such as clocks or calculators.
Square and rectangular batteries: The most common is the 9V battery, used in devices like smoke detectors or wireless microphones. These batteries can provide higher voltage because they contain multiple smaller batteries inside the casing.
Here is an example of different battery shapes and sizes:
WHAT IS DIRECT AND ALTERNATING CURRENT?
For electronic devices like the one we are going to build, we will use direct current, but what exactly is that? What other types of current exist, and what are they used for?
There are two types of electrical current: direct current (DC) and alternating current (AC). Understanding the difference is important because each type is used in different devices and situations. Direct current is ideal for electronic devices like mobile phones, computers, and battery-powered toys, while alternating current is what powers our homes, supplying electricity for lights, appliances, and outlets.
Here’s a short but comprehensive video from "The Engineering Mindset" explaining it further:
Additionally, using the wrong type of current can damage devices or make them malfunction, so it’s crucial to understand which type is needed and how to convert one to the other if necessary.
- Direct Current (DC)
- Alternating Current (AC)
HOW IS AN ELECTRICAL CIRCUIT GRAPHICALLY REPRESENTED?
This short 3-minute video by Learn Science with B, although not featuring the same components as our circuit, will help explain the basic concepts of electrical circuit representation:
HOW TO CALCULATE THE POWER SOURCE'S LIFESPAN?
Next, we will calculate the lifespan of our power source.
We need to consider that:
- Standard AAA alkaline batteries have an electrical charge capacity of ~1200 mAh.
- If we use rechargeable NiMH batteries, they usually range between 800-1000 mAh.
- As we saw in the air pump specification sheet, our 6V air pump requires a maximum of 300 mA.
To estimate the duration, we simply divide the capacity by the consumption.
If using standard alkaline batteries (1200 mAh):
- Duration = Capacity (mAh) / Consumption (mA) = 1200/300 = 4 hours
If using NiMH rechargeable batteries (800-1000 mAh), the duration would be:
- Duration = 800/300 = 2.6 hours
- Duration = 1000/300 = 3.3 hours
HOW TO KNOW HOW MUCH ENERGY A DEVICE CONSUMES IN AN HOUR?
To calculate energy consumption in kilowatt-hours (kWh), which is what the electricity bill measures:
kWh = (Watts × Hours of use) / 1000
Example: A 100W television turned on for 5 hours:
(100W × 5) / 1000 = 0.5 kWh
Dispensers
HOW DOES THE AIR PUMP WORK?
The mechanism is simple:
- The motor spins like a wheel. When you close the circuit and electricity flows, the motor starts spinning, just like when you pedal a bicycle and the wheels move.
- The motor moves a small "arm" that, in turn, moves flexible rubber pieces that go up and down each time the motor rotates. This part is called a diaphragm, as it functions similarly to the human body's diaphragm, which helps the lungs take in and expel air.
- Air enters on one side and exits on the other. When the rubber moves up, it draws air in through a small hole. When the rubber moves down, it pushes the air out.
This creates a continuous airflow. Since the motor never stops spinning, the air keeps entering and exiting continuously.
The following video shows the inside of one of the air pumps we used for this machine:
WHY DOES THE LIQUID COME OUT?
Our system uses air pressure to force the liquid out of the bottle.
Technically, this is called a pressure extraction mechanism, and it works as follows:
- When the air pump is turned on, as we saw, it generates movement that allows air to enter through one nozzle and exit through another, to which a PVC tube is connected.
- The air flows through this tube and enters the top of the bottle through the cap.
- Since there is no way for the air to escape (because the cap is sealed), the pressure increases, pushing the liquid down.
- The only exit is through the other PVC tube (the thicker one). Since it is not sealed, the liquid is pushed out through it.
In short, it's like trying to inflate a balloon filled with water, and at the bottom of the balloon, there's a tiny hole through which the water exits when you blow into it.
Lessons Learned
We wanted to summarize the things we would change if we had to do the project again:
- Be careful when folding the main box piece to ensure that no advertising is visible.
- Analyze the required wiring more thoroughly before purchasing.
- Use a AAA battery holder instead of a 9V battery.
- Use less packing tape and more paper fasteners.
- Ignore suggestions to use a drill and soldering iron (due to the potential risks).
- Purchase a fluid retention valve or consider adding something to catch annoying drips.
Next Steps
This has been the first project we have documented, although we had done some smaller projects before.
Expand if you're interested in seeing other things we've done 😊.
That I can remember right now:
- In 2019, when I bought the Micro:bit kit for the workshops we organized from Tomelloso Tech, we programmed the Micro:bit board to display a happy or sad face depending on whether the left or right button was pressed.
- In 2019, I also collaborated with Technovation Families, although I suppose he didn’t quite understand it, we trained an AI together to recognize dogs and other things.
- In 2022, we made a basic design of a Minecraft character in Blender.
- Last year (2024), we published his first game on his Scratch profile (Basket pong), and also worked on OctoStudio, where I introduced him to the concept of variables for the first time.
- And last Christmas, we also made a mini video montage with his cousins ("Excursion to the Calahonda Mines"), in addition to assembling and programming the mBot that Santa Claus brought him.
Although I’m sure I’m forgetting some things... 😅
Sometimes I think about documenting previous experiences, but the truth is, work keeps piling up, and we have to decide whether to document the past or focus on the future. Documenting this one in particular was not quick. So, we’ll see!
Moreover, in this playlist, we keep saving some ideas, and we have already purchased materials for more projects, such as:
- Two Joysticks and a Raspberry Pi Zero W to create an arcade machine.
- Several items for learning to solder, like this beetle and this car.
- ELEGOO basic starter kit with Arduino.
- An LCD screen that we might use to build a mini console (we’ll see).
Besides printing models created by others with our new 3D printer, we also want to design and print our own creations...
So, in short... the future is uncertain 😂.
If any family follows this tutorial, please 🙏 let me know. You can contact me through any of my networks or by email (hhkaos@gmail.com).